setup 语法糖的前世今生
Q: Vue3 最推荐的写法是什么?它是怎么一步一步演进而来的?
A: 目前 Vue3 最推荐的写法是 setup 语法糖(<script setup>),但它并非一开始就是这样,而是经历了从 Options API 到 Composition API,再到 defineComponent,最后到 setup 标签写法的演进过程。
阶段一:Vue2 Options API 经典写法
在 Vue2 时期,组件采用 Options API,通过 data、methods、props 等选项来组织代码:
export default {
  name: 'TaskManager',
  props: {
    initialTasks: { type: Array, required: true, default: () => [] },
  },
  data() {
    return {
      tasks: [...this.initialTasks],
      newTaskTitle: '',
    };
  },
  methods: {
    addTask() {
      if (this.newTaskTitle.trim() === '') return;
      this.tasks.push({ id: Date.now(), title: this.newTaskTitle, completed: false });
      this.newTaskTitle = '';
    },
    completeTask(id) {
      const task = this.tasks.find((task) => task.id === id);
      if (task) { task.completed = true; this.$emit('task-completed', task); }
    },
  },
};
这种写法的缺点是:逻辑分散在不同选项中,当组件逻辑复杂时,代码难以维护和复用。
阶段二:Vue3 初期 Composition API
Vue3 推出 Composition API,在 setup 函数中统一组织数据和方法,最后返回给模板使用:
import { ref, toRefs } from 'vue';
export default {
  name: 'TaskManager',
  props: { initialTasks: { type: Array, required: true } },
  emits: ['task-completed', 'task-uncompleted'],
  setup(props, { emit }) {
    const { initialTasks } = toRefs(props);
    const tasks = ref([...initialTasks.value]);
    const newTaskTitle = ref('');
    const addTask = () => { /* ... */ };
    const completeTask = (taskId) => { /* ... */ emit('task-completed', task); };
    return { tasks, newTaskTitle, addTask, completeTask };
  },
};
这种写法依然保留了 Options API 的影子,需要手动 return 数据和方法。
阶段三:defineComponent 辅助函数
defineComponent 是 Vue3 引入的一个辅助函数,主要用于 TypeScript 提供更好的类型推断。但它没有从根本上改变 Composition API 的写法,本质依然相同。
阶段四:setup 语法糖(最终形态)
从 Vue 3.2 版本开始正式引入 <script setup> 语法糖:
import { ref, toRefs } from 'vue';

const props = defineProps({
  initialTasks: { type: Array, required: true },
});
const emit = defineEmits(['task-completed', 'task-uncompleted']);

const { initialTasks } = toRefs(props);
const tasks = ref([...initialTasks.value]);
const newTaskTitle = ref('');

const addTask = () => { /* ... */ };
const completeTask = (taskId) => { /* 直接使用 emit('task-completed', task) */ };
其优化点主要有两方面:
- 简化书写:所有顶层定义的变量和方法会自动暴露给模板,无需手动
return。 - 更好的类型推断:TypeScript 类型推断更加直观和简单。
关于「宏」的理解
defineProps 和 defineEmits 实际上是一种编译宏。宏的概念源自 C 语言,在编译前会对宏代码进行文本替换(预处理)。同样地,defineProps 和 defineEmits 在编译阶段会被替换为 Vue3 早期的 props 和 emits 配置。这一点可以从 vite-plugin-inspect 插件的编译分析中得到验证——setup 语法糖最终会被编译为 Composition API 早期的写法。
expose 行为的区别
setup 语法糖虽然只是语法糖,但在 expose 行为上与传统写法有所不同。在传统写法中,通过 ref 获取组件实例时,默认能访问组件内部所有数据和方法。Vue 提供了 expose 方法让组件自行决定暴露哪些成员。而在 setup 语法糖中,默认行为就是完全不对外暴露任何成员,需要通过 defineExpose 宏来显式声明。
defineExpose({
  // 要暴露的成员
});
组件生命周期全景
Q: Vue3 的生命周期钩子有哪些?它们的执行顺序是怎样的?
A: Vue3 的组件生命周期分为五个大阶段,每个阶段对应一组钩子函数。
五大生命周期阶段
| 阶段 | 关键钩子 | 说明 |
|---|---|---|
| 初始化选项式 API | setup / beforeCreate / created | 组件实例创建前后 |
| 模板编译 | beforeMount | 模板编译完成后 |
| 初始化渲染 | mounted | 真实 DOM 生成后 |
| 更新组件 | beforeUpdate / updated | 响应式数据变化时 |
| 销毁组件 | beforeUnmount / unmounted | 组件卸载前后 |
Vue2 与 Vue3 钩子对照
| 生命周期名称 | Vue2 | Vue3 |
|---|---|---|
| beforeCreate 阶段 | beforeCreate | setup |
| created 阶段 | created | setup |
| beforeMount 阶段 | beforeMount | onBeforeMount |
| mounted 阶段 | mounted | onMounted |
| beforeUpdate 阶段 | beforeUpdate | onBeforeUpdate |
| updated 阶段 | updated | onUpdated |
| beforeUnmount 阶段 | beforeDestroy | onBeforeUnmount |
| unmounted 阶段 | destoryed | onUnmounted |
值得注意的是,Vue2 和 Vue3 的生命周期钩子在同一个组件中可以共存(例如同时写 mounted 和 onMounted),Vue3 钩子的执行时机会比 Vue2 对应的钩子稍早一些。不过实际开发中不会同时使用两种写法。
生命周期的本质
所谓生命周期,本质上就是在合适的时机调用用户所设置的回调函数。
从源码角度看,渲染器在渲染组件时,先从选项对象中提取注册的生命周期钩子函数,然后在内部流程的对应位置调用它们:
function mountComponent(vnode, container, anchor) {
  const { render, data, beforeCreate, created, beforeMount, mounted, beforeUpdate, updated } = componentOptions;

  beforeCreate && beforeCreate();           // 组件实例创建前
  const state = reactive(data());
  const instance = { state, isMounted: false, subTree: null };
  vnode.component = instance;
  created && created.call(state);           // 组件实例创建后

  effect(() => {
    const subTree = render.call(state, state);
    if (!instance.isMounted) {
      beforeMount && beforeMount.call(state); // 挂载前
      patch(null, subTree, container, anchor);
      instance.isMounted = true;
      mounted && mounted.call(state);         // 挂载后
    } else {
      beforeUpdate && beforeUpdate.call(state); // 更新前
      patch(instance.subTree, subTree, container, anchor);
      updated && updated.call(state);           // 更新后
    }
    instance.subTree = subTree;
  }, { scheduler: queueJob });
}
嵌套组件的生命周期顺序
当组件嵌套时,生命周期遵循递归模式。假设 A 组件下嵌套了 B 组件:
- 组件 A:onBeforeMount
- 组件 B:onBeforeMount
- 组件 B:mounted
- 组件 A:mounted
销毁时同样是递归逻辑——先销毁子组件,再销毁父组件。
KeepAlive 生命周期与原理
Q: KeepAlive 是如何工作的?它的核心原理是什么?
A: KeepAlive 的概念借鉴于 HTTP 协议中的 HTTP 持久连接。在 Vue 中,keep-alive 组件用于缓存组件,避免组件被频繁地销毁和重建,从而优化性能。
基本使用回顾
在 Tab 切换场景中,不使用 keep-alive 会导致每次切换都销毁和重建组件:
<template>
  <Tab v-if="currentTab === 1">...</Tab>
  <Tab v-if="currentTab === 2">...</Tab>
  <Tab v-if="currentTab === 3">...</Tab>
</template>
使用 keep-alive 包裹后,组件会被缓存:
<keep-alive>
  <Tab v-if="currentTab === 1">...</Tab>
  <Tab v-if="currentTab === 2">...</Tab>
  <Tab v-if="currentTab === 3">...</Tab>
</keep-alive>
同时支持 include、exclude、max 等属性进行精细化控制。
KeepAlive 专属生命周期
组件被缓存后,常规的生命周期钩子(如 onMounted、onUnmounted)不会再触发,这带来了新问题:不知道组件是否处于激活状态。为此,Vue3 提供了两个专属钩子:
- onActivated:首次挂载及组件激活时触发
- onDeactivated:组件卸载及组件失活时触发
KeepAlive 的核心实现
KeepAlive 的实现需要渲染器层面的支持。当组件需要「卸载」时,不是真的卸载,而是搬运到隐藏容器中(即「假卸载」)。当需要重新挂载时,再从隐藏容器搬回来。
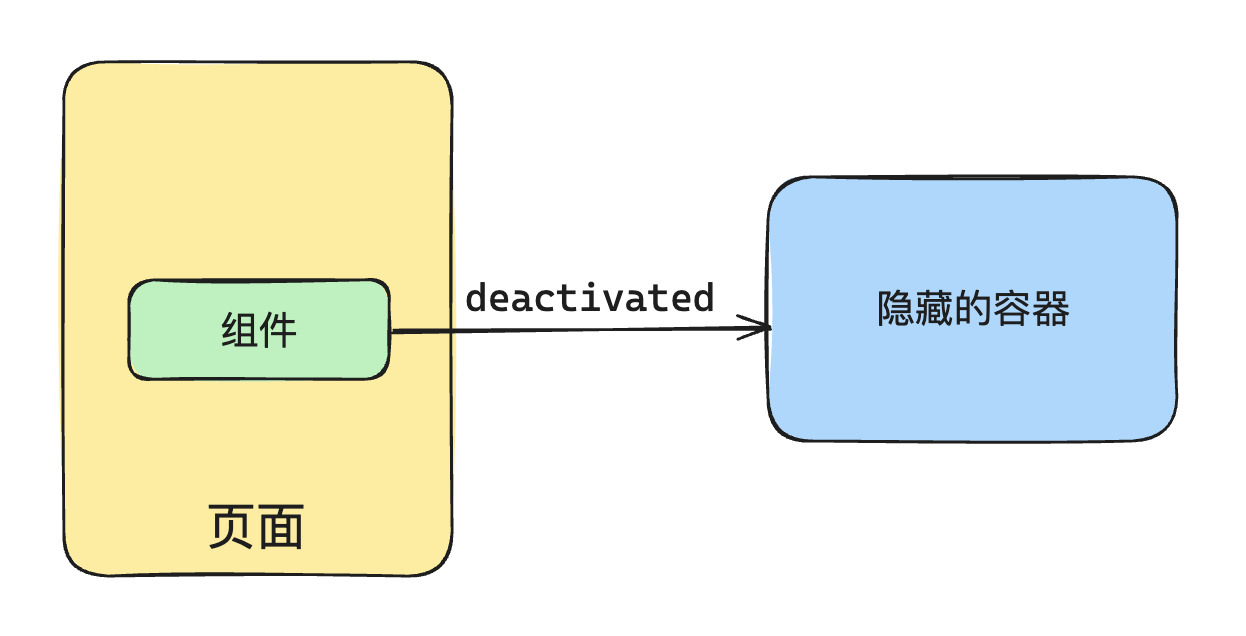
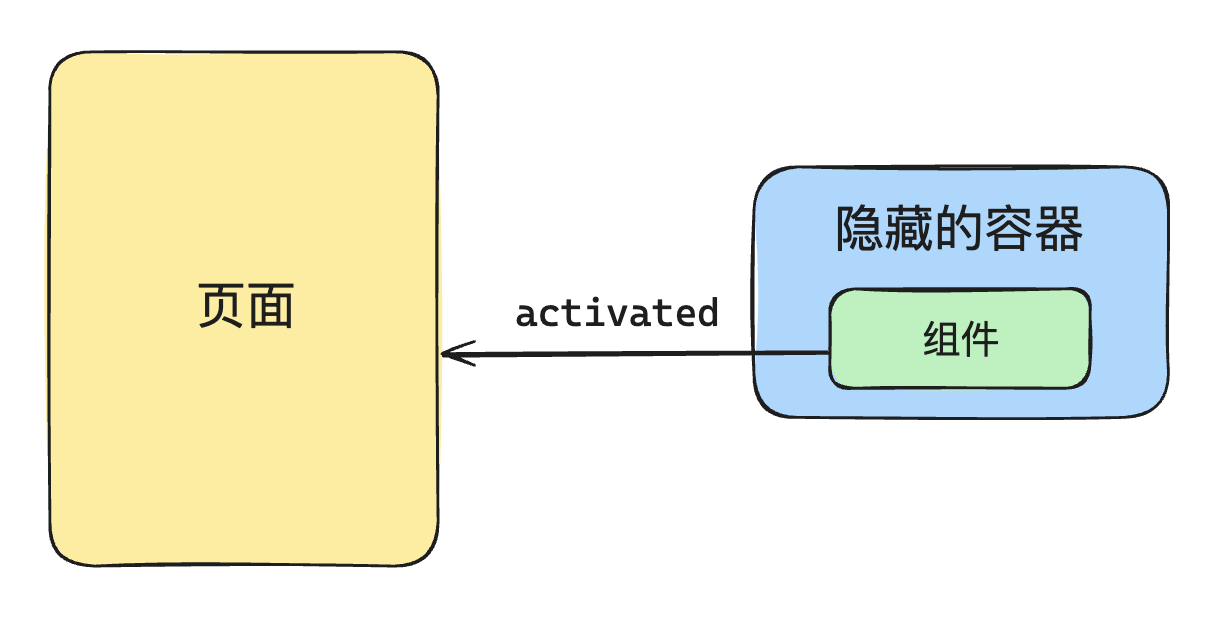
基本实现原理:
const KeepAlive = {
  __isKeepAlive: true,
  setup(props, { slots }) {
    const cache = new Map();                    // 缓存对象:key → vnode
    const instance = currentInstance;
    const { move, createElement } = instance.keepAliveCtx;
    const storageContainer = createElement('div'); // 隐藏容器

    // 失活:移动到隐藏容器
    instance._deActivate = (vnode) => { move(vnode, storageContainer); };
    // 激活:移动回页面容器
    instance._activate = (vnode, container, anchor) => { move(vnode, container, anchor); };

    return () => {
      let rawVNode = slots.default();
      if (typeof rawVNode.type !== 'object') return rawVNode;

      const cachedVNode = cache.get(rawVNode.type);
      if (cachedVNode) {
        rawVNode.component = cachedVNode.component;
        rawVNode.keptAlive = true;      // 标记:已缓存
      } else {
        cache.set(rawVNode.type, rawVNode);
      }
      rawVNode.shouldKeepAlive = true;  // 标记:需要缓存
      rawVNode.keepAliveInstance = instance;
      return rawVNode;
    };
  },
};
KeepAlive 组件对「内部组件」添加了三个关键标记属性,与渲染器配合工作:
| 标记属性 | 作用 |
|---|---|
keptAlive |
标识组件已被缓存,渲染器不会重新挂载,而是调用 _activate 激活 |
shouldKeepAlive |
标识需要缓存,卸载时不会真正卸载,而是调用 _deActivate 移入隐藏容器 |
keepAliveInstance |
让内部组件持有 KeepAlive 实例,以便访问激活/失活方法 |
缓存管理策略
KeepAlive 通过 max 属性控制缓存上限,采用类似 LRU 的淘汰策略:当缓存数量超过阈值时,最久未被访问的缓存实例会被销毁。
keys.add(key); // 新缓存加入队列末尾
if (max && keys.size > parseInt(max, 10)) {
  pruneCacheEntry(keys.values().next().value); // 删除最旧的
}
include 和 exclude 则通过对组件名称进行正则匹配来控制缓存范围。
key 的本质与 diff 算法
Q: Vue 中的 key 到底起什么作用?为什么不能使用数组下标作为 key?
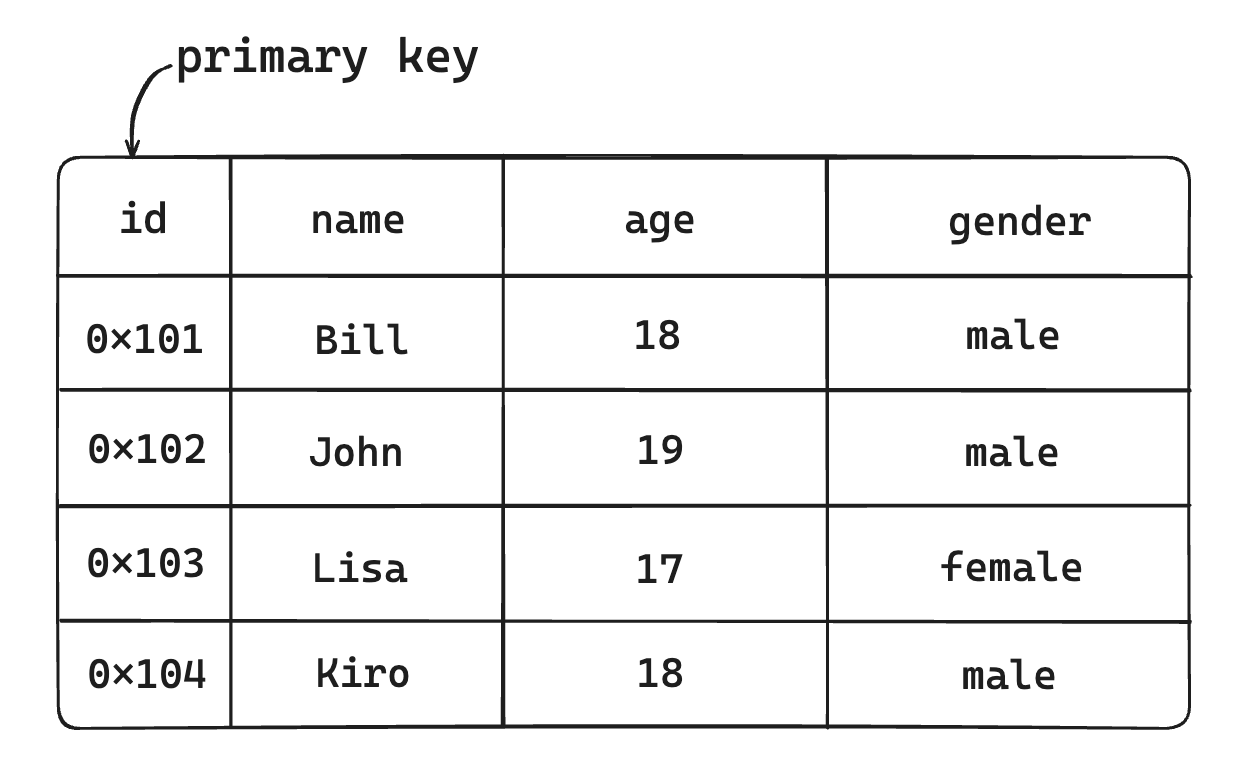
A: 在关系型数据库中,primary key 用于标记数据的唯一性,方便精准查找。Vue 中的 key 道理相同——它是虚拟节点(VNode)的唯一标识。
不用 key 时的复用问题
假设新旧 VNode 列表如下:
// 旧
const oldVNode = { type: 'div', children: [
  { type: 'p', children: '1' },
  { type: 'p', children: '2' },
  { type: 'p', children: '3' },
]};
// 新
const newVNode = { type: 'div', children: [
  { type: 'p', children: '4' },
  { type: 'p', children: '5' },
  { type: 'p', children: '6' },
]};
如果不采用任何复用策略,需要 6 次 DOM 操作(3 次删除 + 3 次新增)。
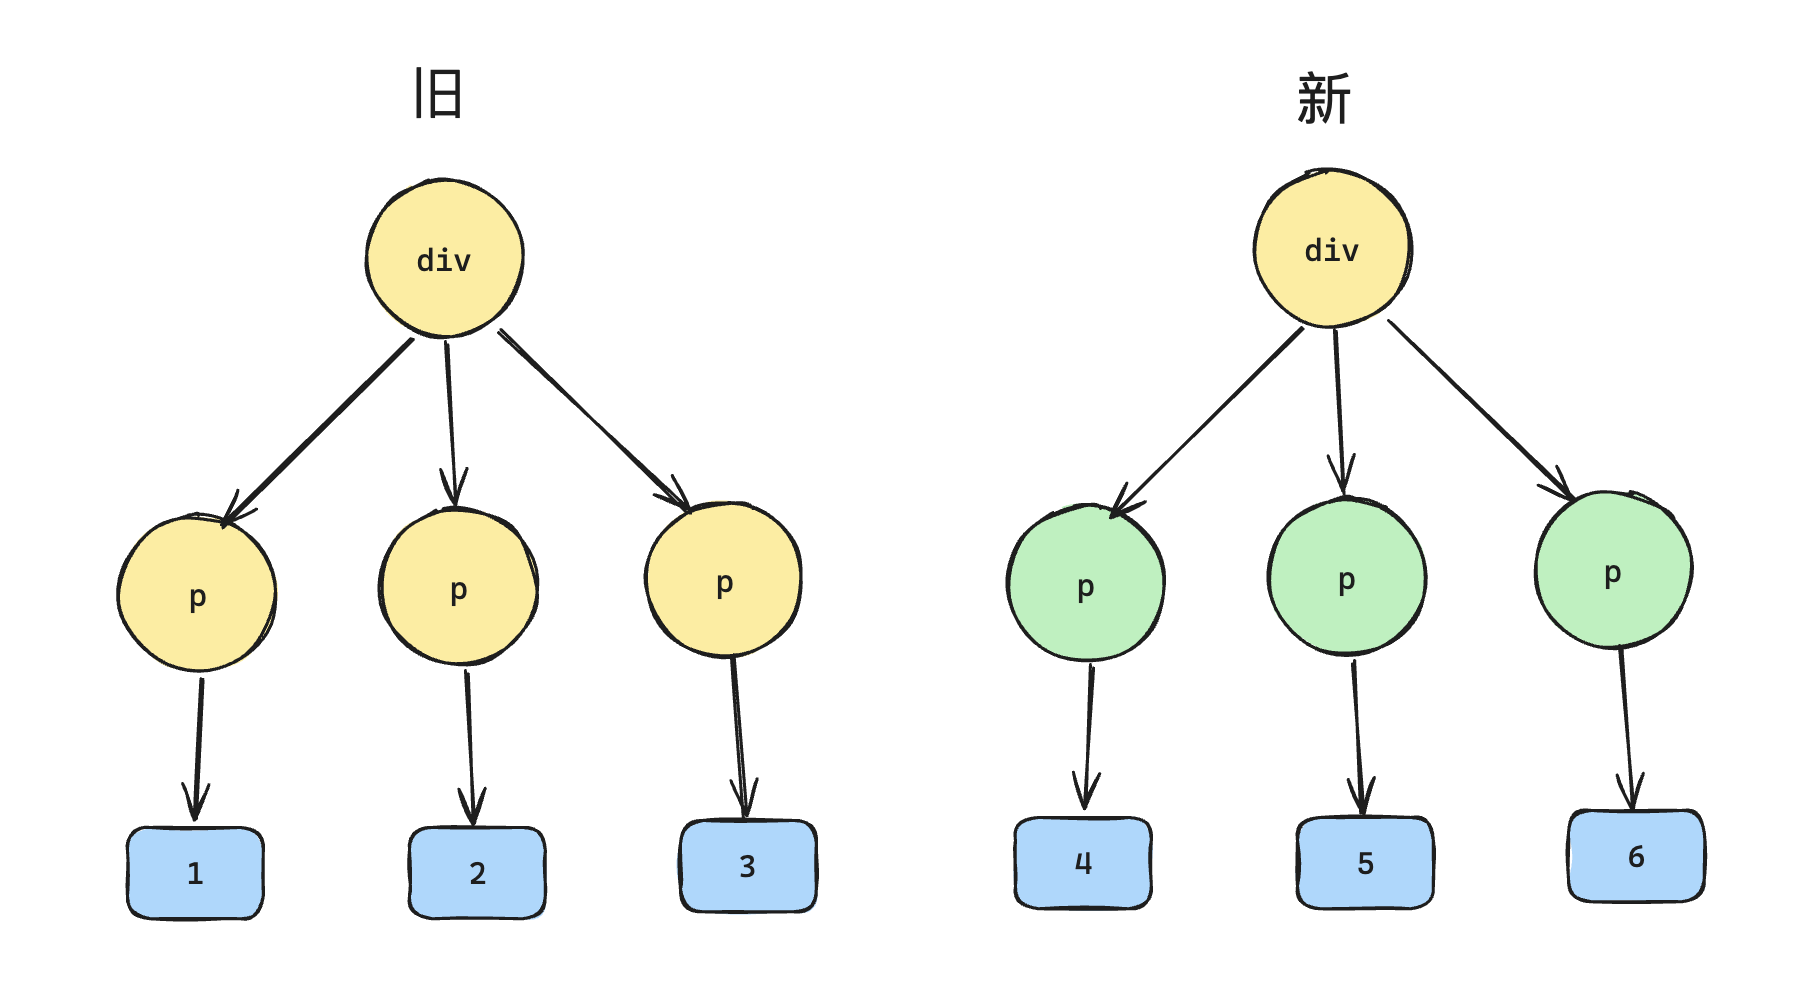
通过简单的遍历复用(按索引一一对应更新文本),只需要 3 次 DOM 操作,性能提升一倍。
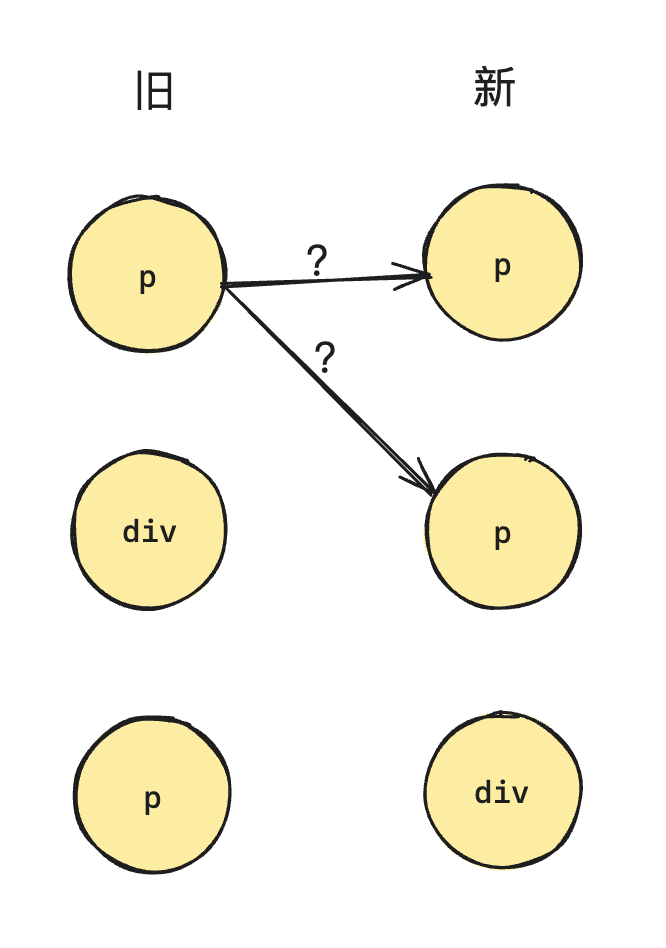
但当子节点类型和顺序都发生变化时,仅靠 type 无法判断是否可以复用:
引入 key 后的精准复用
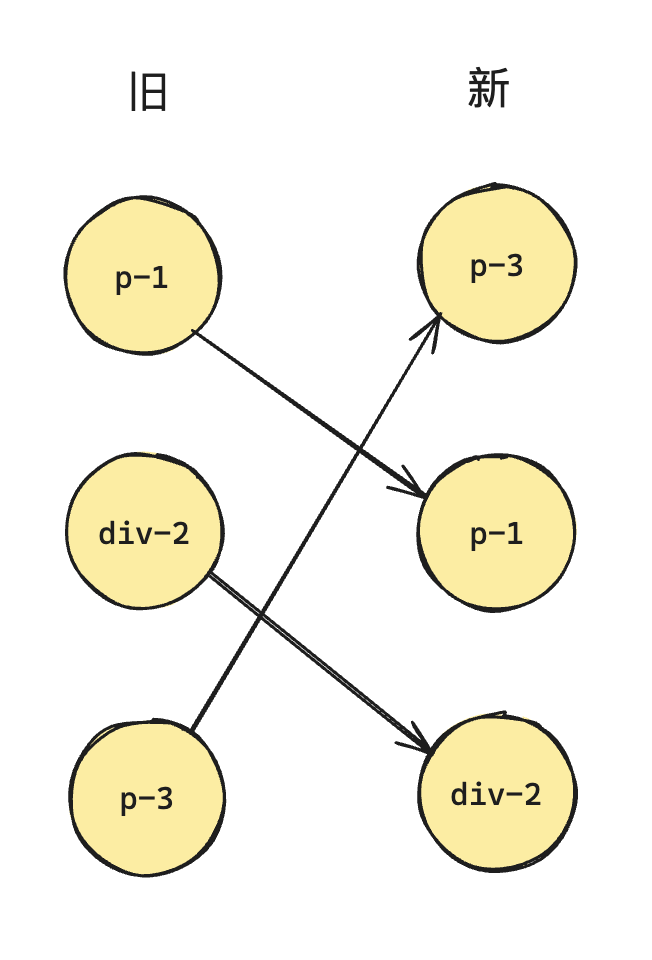
key 相当于给每个 VNode 一个「身份证号」,通过 key 可以精准找到对应的 VNode:
// 旧
const oldVNode = { type: 'div', children: [
  { type: 'p', children: '3', key: 1 },
  { type: 'div', children: '2', key: 2 },
  { type: 'p', children: '1', key: 3 },
]};
// 新
const newVNode = { type: 'div', children: [
  { type: 'p', children: '1', key: 3 },
  { type: 'p', children: '3', key: 1 },
  { type: 'div', children: '2', key: 2 },
]};
当 VNode 的 type 和 key 都相同时,说明是同一组映射,可以进行 DOM 节点复用,只需移动 DOM 即可。
就地更新策略 vs 有 key 的精准复用
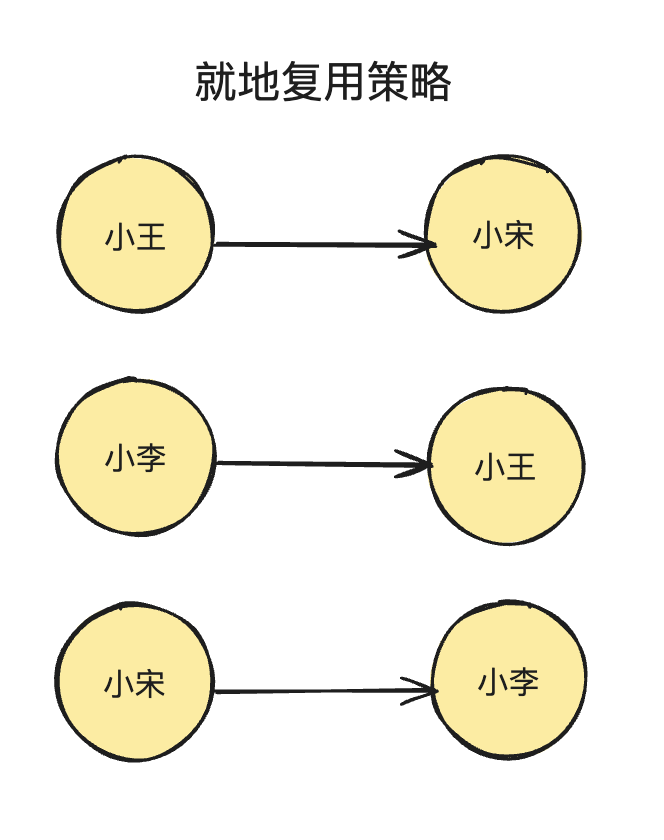
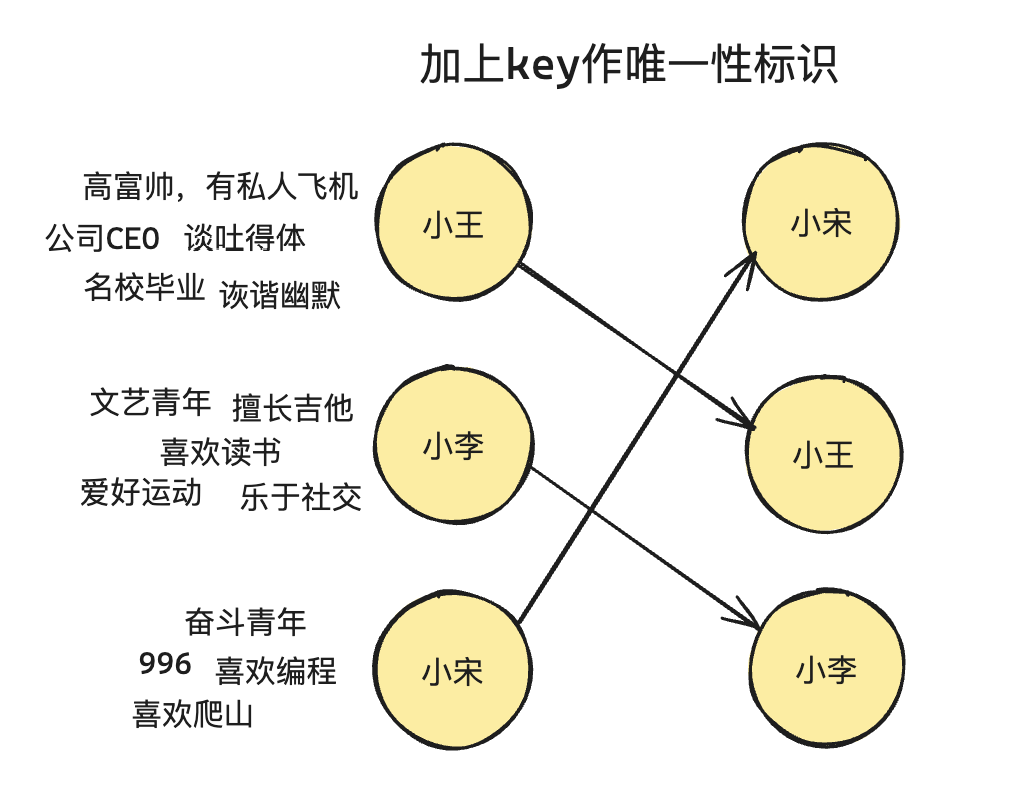
没有 key 时,Vue 内部采用「就地更新」策略——在旧节点中找一个类型相同的就直接复用。这种策略默认是高效的,但仅保证 DOM 节点类型对得上。如果节点依赖子组件状态或临时 DOM 状态,就地复用反而会造成状态错乱。
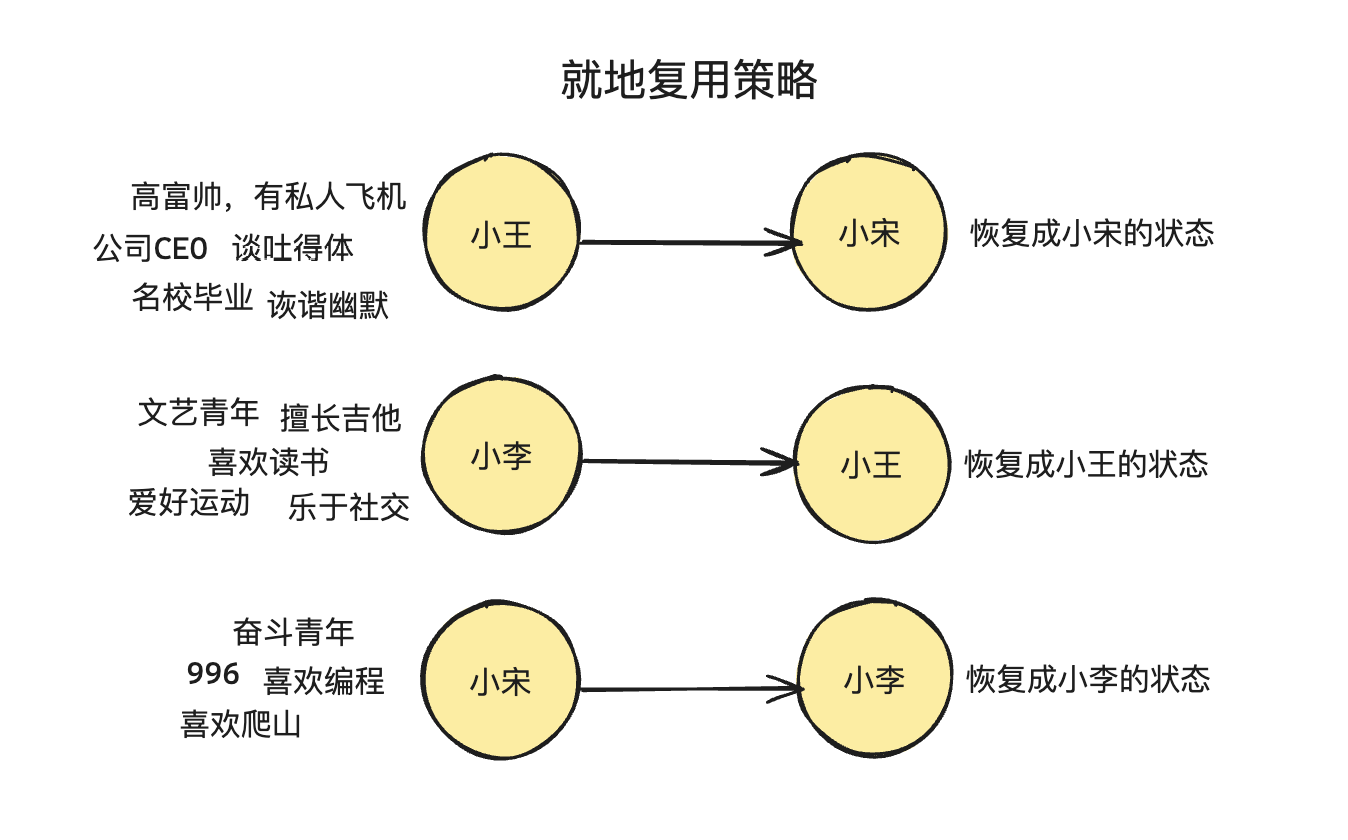
加上 key 后,新旧节点能够精准对应,避免状态的错误还原:
为什么不能使用数组下标作为 key?
使用下标作为 key 时,如果列表中发生插入或删除操作,每个元素的 key 都会变化,Vue 会复用错误的元素,导致状态和数据不一致:
// 初始状态
[{ id: 1, text: 'Item 1' }, { id: 2, text: 'Item 2' }, { id: 3, text: 'Item 3' }]

// 删除第二个元素后,第三个元素的下标从 2 变为 1
// Vue 会误以为原本的第三个元素和第二个元素是同一个,导致错误更新
[{ id: 1, text: 'Item 1' }, { id: 3, text: 'Item 3' }]
key 的核心价值总结
- 高效更新:帮助 Vue 识别哪些元素是变化的、哪些是新的、哪些需要被移除,避免不必要的 DOM 操作。
- 确保元素唯一性:每个元素在列表中可被唯一标识,避免在移动、插入或删除时出现混淆。
- 提升渲染性能:通过 key 快速定位到需要更新的元素,避免重新渲染整个列表,在大列表场景下优势尤为明显。
总结
本文从 setup 语法糖的演进历程入手,介绍了 Vue3 组件写法的四种形态,重点理解了 defineProps 和 defineEmits 作为编译宏的本质。在生命周期部分,深入分析了钩子函数的执行时机、嵌套组件的递归挂载顺序,以及 onActivated/onDeactivated 这两个 KeepAlive 专属钩子的使用场景。KeepAlive 的核心原理是通过隐藏容器实现「假卸载」,配合 keptAlive、shouldKeepAlive 等标记与渲染器紧密协作。最后讲解了 key 在 diff 算法中的关键作用——它是 VNode 的唯一标识,精准复用比就地更新更可靠,始终应避免使用数组下标作为 key。